Introduction
On Demand Solutions product builder allows users to setup a variety of product builds that can be assigned to products, so that when orders are placed, information on the build can either be emailed as part of the order or transferred directly to SAP
Overview
To access the product builder in admin, go to Manage products > Product Builder.
There are 3 sections to each build in this menu, Sku's, Configure and rules.

SKU's
 The area will show you all the built sku's currently held in SAP for a build.
by click on new, you generate new skus for SAP, without having to place an order for them.

When building them in here, it will follow the exact same rules as when a user is building a sku.
Configure
Here you will be able to see all the groups and options linked to a build.

Whether creating a new build manually or via the product import, here you will be able to modify the order of the options groups and their options by clicking and dragging them.
Additionally, you will bee able to set groups as required or not using the tick box.
The code is what will be sent to SAP as part of the build while the description will advise users what the part is for
under select product, you will be able to see whether the option is linked to an item or not, if a build is being generated via sap, that items information will have been used by ODSnet to determine how the build was constructed, i.e generic code will have advised ODSnet that that item is part of this build.
The plus and minus allow you to remove or add new options to a group.
Lookup type determines, what type of group the options are.
Lookup would just be options displayed, with nothing linked
Product will be options linked to item in ecom.
Freetext will set the group as a text box, i.e for customer notes.
Once you've made any changes to you options group, click save.
Rules
Along with the 'Required' under configure, rules are how you determine what options a customer can select.
There are 4 modifications you can make via rules.
Rules can only be set against individual options under a group.
To create a new rule, click new rules from the top right hand corner of the page.
Selected - This can be though of as a precursor to the other rules settings, you're stating when this option is selected,
something will occur.
Hide - With this you're saying when another option is selected, this option will be hidden, this is best used, when options are not compatible together.
Visible - This column is advising, when ticked that by default an options is visible to users, however when unticked, users will not be able to see until the rules allow this option to be shown.
Show - Only available when when an option has it's visible option unticked.
Here we're advising that a part can only be displayed when another have been selected.
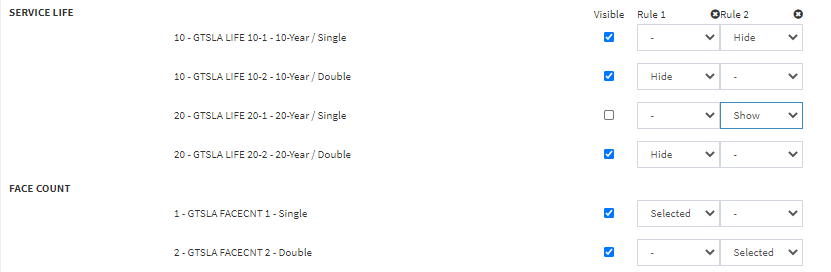
Examples
Rule 1
Service life 20 - 1 cannot be chosen by customer, and when face count 1 is selected service life 10-2 and 20-2 are hidden, if service life is a required group, customers would only be able to select 10-1.
Rule 2
When Face count 2 is selected, service life 20-1 will be available to customers, while 10-1 is hidden, customers would be able to select from 3 service life options.